Creating the Transactional Message Template Body
The transactional message template body is created or uploaded in the Step 3 section of the transactional message template creation screen.
Adding Content
- Use one of the following options to add content to your transactional message template:
- Type the text and/or HTML code of your creative.
- Copy and paste text and/or HTML from a previously prepared creative.
If you copy and paste content from another transactional message template in Actito, make sure to untrack all links before copying the content from the original message.
- Upload the content from a previously prepared creative.
- Upload a template and add text and images to the editable parts of the template.
Uploading Content
To upload the content of your transactional message template from a previously prepared creative:
- In the Toolbox, click Content Upload.
- In the Creative Upload window, enter the URL of the creative or browse to the location of the creative and click Upload.
If you use a creative hosted on your CMS, uploading it will copy the HTML code into the transactional message template body. Any edits made to the CMS-hosted version will not impact the copied version.

You can add external content to a part of a message or create a message entirely composed of external content.
To add content from your CMS to a part of the message:
- Enter
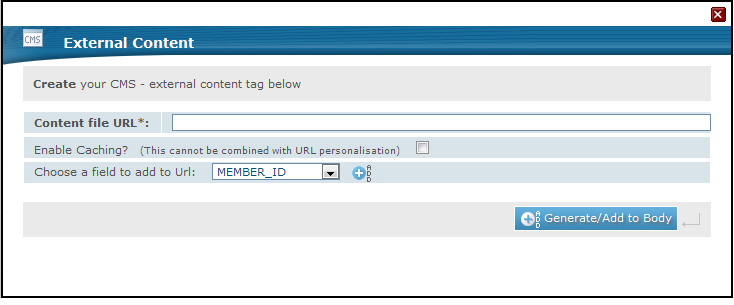
&&&in the part of the message where you want the external content to appear. - In the Toolbox, click External Content.
- Enter the URL of the content.
- If you want to enable caching, check the Enable Caching? checkbox. The advantage of caching is that messages can be generated faster (allowing the entire campaign to be sent faster) and the site hosting the external content will not be overly demanded when the content is needed.
Caching cannot be combined with message personalization. If you check the Enable Caching? checkbox, the message personalization field will no longer be available.
- If you want to add personalization, select the field to which the personalization should apply.
- Click the Generate/Add to Body button.
To create a message entirely composed of content from your CMS:
- Delete the
<html></html>and<body></body>tags. - Enter
&&&after the[EMV HTMLPART]tag. - In the Toolbox, click External Content.
- Enter the URL of the content.
- If you want to enable caching, check the Enable Caching? checkbox. The advantage of caching is that messages can be generated faster (allowing the entire campaign to be sent faster) and the site hosting the external content will not be overly demanded when the content is needed.
Caching cannot be combined with message personalization. If you check the Enable Caching? checkbox, the message personalization field will no longer be available.
- If you want to add personalization, select the field to which the personalization should apply.
- Click the Generate/Add to Body button.
Configuring the Display of Your Transactional Message
Adding Dynamic Content
If you want to add a dynamic content block to the transactional message template:
- Enter
&&&in the part of the transactional message template where you want the dynamic content block to appear.
If there are multiple occurrences of &&& in the transactional message template, only the first occurrence will be replaced.
- In the Toolbox, click Insert Dynamic Content Block.
- Select the dynamic content block from the list displayed in the Dynamic Content Blocks window and click Add.
- The dynamic content block is added to the transactional message template replacing the first occurrence of
&&&.